Showing posts with label recipe. Show all posts

Matcha blondies (aka green tea white chocolate brownies)

I have really missed baking, what with being crazy busy at work and paperwork for the sale of my family home being finalised just before Monsieur Poisson and I left on a rather rushed trip to Europe. The first two weeks back in Sydney were no better, with masses of catch-up needing to be done work-wise to meet a tight deadline.

The actions of leisurely baking are always comforting and, coupled with the winter weather, there are so many levels of warmth that mixing, stirring and standing in front of an oven can bring. However with the travel from Munich back to Sydney wearing me out (my inability to sleep on flights strikes again) combined with two weeks’ worth of long work hours, the motivation to spend hours in the kitchen are pretty low – and that’s despite the promise of comforting baking aromas and warming sweets afterwards.


A chocolate cream cake for Mum

For years and years Mum kept saying that the cakes I made weren’t light enough. Turns out it’s because she prefers the spongier texture and subtler flavour of Asian bakery cakes, rather than those with a cakier crumb which I enjoy. So with it being Mum’s birthday – well, one of her birthdays, depending on whether she chooses to celebrate according to the Gregorian calendar or the Chinese Lunar one – and an appropriately timed post from Vondelicious, I decided to give baking one those Asian-style cakes a try.


An experimental sous-vide dinner

A happy New Year to you all! *cue: party poppers, streamers, confetti, etc*

To be honest the Christmas and the New Year period felt like eons ago, especially after having spent it overseas and with mad last minute dashing about just before leaving. Flights were booked well in advance but packing coincided with the usual end of year rush and trying to catch up with various people before they disappeared on respective holidays themselves. An experimental sous-vide-cum-Christmas dinner was organised with the usual suspects Chez Délicieuse et Poisson – something I’ve been wanting to do since slow cooking eggs in our thermos kettle.


A trophy of chocolate cakes

I used to work with Dr Colin. Colin is a quietly competitive sort who has been trying to beat me at a particularly popular word-making game. He has been trying to beat me for...

Quite.

Some.

Time.

After countless games – seriously, we didn’t count – he broke that final frontier and, because it was a momentous occasion, I decided that there should be a just reward of cakes. Cakes with tinted buttercream and chocolate writing.


And of course what is better than a cake is multiple miniature cakes, and ones which are decorated with buttercream – bite-sized nuggets of fun that you can devour in one mouthful. Once you remove the frilly paper cases, that is, but there is no stipulation that you must use them in the first place.

I was going for the cute factor by using these mini-cupcake cases which have cupcakes printed on them – purchased purely for their cute factor – but the chocolaty cake made it a little dark for the cutesy cupcake pattern to be appreciated. So my recommendation is to use bright-coloured or foil cases or just don’t bother at all.

The cakes are made from a recipe of one Domestic Goddess that doesn’t call for a great deal of chocolate. The Alter Eco Dark Velvet chocolate which I used is quite fruity in flavour and soft and fudgy in texture to eat on its own, and is different to other dark chocolates I’ve tried which break with more of a snap. It’s not as intensely dark as other dark chocolates either, although it still results in a rich chocolaty cake. A bonus is that it is both organic and certified Fair Trade.


The batter is light in colour when whipped up, especially in my case where a lack of muscovado sugar made for a substitution with plain ol’ brown sugar instead. The cakes darken upon baking and, like most, become denser and damper when left for a bit of a covered snooze overnight. They’re not overly sweet nor rich, again due to the sugar substitution, which makes them the perfect vehicle for being topped with icing or chocolate ganache. If you choose to have these plain then I strongly suggest adding a small amount of caster sugar, as well as substituting cocoa powder for some of the flour.


Decorate the cakes how you like, spell out a message, or leave them nude. And as for Colin, congratulations to him but we have some rematching to do!

Chocolate mini-cupcakes (makes 48 or so mini-cupcakes,or  24 cupcakes)
(“Dense Chocolate Loaf Cake” from How to be a domestic goddess, recipe by Nigella Lawson)

Ingredients:
·         225g soft unsalted butter
·        375g dark muscovado sugar (or brown sugar)
·        2 large eggs, beaten
·        1 tsp vanilla extract
·        100g dark chocolate, melted and slightly cooled
·        200g plain flour
·        1 tsp bicarbonate of soda
·        250mL boiling water

Method:
  1. Preheat oven to 180°C. Line or lightly grease a cupcake or mini-cupcake tray.
  2. Cream together butter and sugar then add eggs and vanilla, beating in well. Fold in the melted chocolate until evenly combined.
  3. Gently add the flour and bicarb soda gradually, alternately with the boiling water until the mixture is fairly runny.
  4. Divide between cavities of the tray and bake 15-18 minutes for mini-cupcakes, and around 30 minutes for cupcakes.
happy cooking!

Mademoiselle Délicieuse received samples of Alter Eco Dark Velvet chocolate of Kristy Sayer.

Wontons

When I was a kid there were much less Chinese eating options in Chinatown, let alone in the suburbs. Plus the options that were available tended to be more for dinner dining; you know, ordering various dishes to be shared and eaten with rice. But what of the more quick lunch options of noodles, congee and the like? Well, that was not to come for many years which meant that these were often recreated at home instead.

I spent a lot of time making wontons with Mum as a child all the way through to when I left home. It felt like a craft project when I was younger and, although slow, my little hands and stubby fingers found it easy to pleat neat little dumpling parcels without tearing the delicate wrappers. (Apparently it was also a good way to keep me quiet and occupied.) Mum, on the other hand, would be either short on patience, greedy for greater amounts of filling or both, and ended up with many exploding wontons instead.


Mum’s go-to recipe was a beef one and any leftover mince filling was great used in an omelette. I’ve made a pork version here, with minced prawns, wood ear fungus and bamboo shoots, which is more reminiscent of the first ones I ever tried on trips to Hong Kong. Through repeated trips there to visit relatives, I also discovered that wontons didn’t have to be pleated (although the repetitive actions to produce neat results appealed to my Virgo nature) and that the trails of “hanging” wrapper pastry when cooked were meant to make the wontons resemble fat goldfish. A definite bonus to know they’re meant to look a little messy, and each a little different, when time and/or patience are a premium. And, as opposed to Northern Chinese dumplings, wontons are eaten with red vinegar.

The broth that Mum made for the wontons was always from stock cubes. Time spent on slow simmering was reserved for Chinese (medicinal) soups instead. I’ve used a chicken stock paste diluted with water and thrown in some ginger for a more Chinese flavour, but spring onions or coriander could be added too. Unless you’re lazy/disorganised like me and realise you have neither until you start cooking, ahem.


Pork & Prawn Wontons (makes 60, with some leftover filling)

Ingredients:
·  450g pork mince (with a small amount of fat)
·  3 tbs light soy sauce
·  1 ½ tbs dark soy sauce
·  pinch of ground white pepper
·  8 medium prawns, peeled & deveined
·  1 piece of dried wood ear fungus (available from Asian grocers)
·  handful of bamboo shoot slices (available from Asian grocers in cans)
·  1 pack of egg wonton wrappers (60 sheets)
·  4 tbs chicken stock paste (I used Campbell’s Real Stock Paste)
·  1.5L water, plus extra for cooking wontons
·  ginger slices, spring onions and coriander to taste
·  fresh or dried egg noodles, Asian greens, red vinegar to serve (optional)

Method:
  1. Combine pork mince with light soy, dark soy and a sprinkling of ground white pepper. Mix thoroughly and set aside to marinate.
  2. Soak wood ear fungus in a bowl of water for about 30 minutes, making sure it is completely covered. Drain and chop into short, thin shreds.
Wood ear fungus - before and after soaking
  
  1. In the meantime, chop bamboo shoots into similar short, thin shreds.
  2. Roughly chop prawns until they resemble a mince and the mixture is slightly sticky.
  3. Mix pork mince thoroughly with other chopped ingredients. Place approximately 1 teaspoonful of filling mixture in the centre of a wonton wrapper and pinch together to close. Repeat with remaining wrapper sheets until all used. 

  1. Bring 1.5L water to the boil and dissolve the stock paste into it. Add ginger and any herbs (if using) and allow to reboil before adding salt to taste. Reduce to a simmer and keep hot.
  2. Bring a pot of water to the boil. Drop in wontons in batches and they are cooked when they float to the top and water reboils. Take care not to overcrowd the pot. Remove with a slotted spoon and ladle over hot stock to serve. 
Extra wontons can be frozen flat on a tray or plate and transferred to a freezer bag once completely frozen. Excess mince filling can be flattened into a shallow dish, steamed for about 8 minutes on high heat and served with rice - tada, steamed Chinese meatloaf!


happy cooking!

Mademoiselle Délicieuse received samples of Campbell’s Real Stock Paste courtesy of Nuffnang Australia.

Wagon Wheel Profiteroles

Somehow when making profiteroles once, I ended up with leftover choux puffs and not enough filling. Sure, it would’ve been easy enough to fill them with scoops of vanilla ice-cream and serve them blanketed with a glossy chocolate sauce but I decided to experiment with other things instead – namely strawberry jam and marshmallows.


Nothing special, just store-bought marshmallows and some really good Ricardoes strawberry jam Mistress had brought back from her travels. Sandwiched into choux puffs and heated in the oven until the innards become gooey, they reminded me of Wagon Wheel biscuits once they’d been doused liberally with chocolate sauce.


To make them taste more like Wagon Wheels I’d recommended using more jam than the teaspoon or so I did above. Otherwise it’s just a matter of splitting choux puffs and the same number of marshmallows in half, and layering them with together with jam squished in the middle. Wrap them up in foil before popping into a preheated 200°C oven for about 5 minutes before unwrapping and heating for a further 5 minutes for the outsides to crisp up. Serve with chocolate sauce.


And because I made these originally with Mistress in my company, I’d like to take this opportunity to also wish her a very happy birthday for today ♥

happy cooking!

The quest for scones

Scones are one of the earliest things I attempted to bake from scratch rather than from a packet mix. It’s seemingly simple with a short and easily-accessible list of ingredients and no complicated technique involved. But of course the simplest things are always the hardest to get right, precisely because there is so little to be done that it is so easy to overdo.

Over the years there has been much frustration with various recipes combined with my mother’s old electric oven yielding differing degrees of success/failure. Recipes with butter. Recipes without butter. Recipes asking for the butter to be rubbed in. Recipes asking for the butter to be melted. Recipes with plain milk. Recipes with buttermilk. But, most importantly, recipes none of which gave the resulting fluffy scones I wanted.


Finally baking in a reliable oven helped, but what helped most – well, in my opinion anyway – was finally trying out a recipe from the Country Women’s Association, whose famed scones can be found at the Royal Easter Show year on year. The recipe involves using cream which seems to help in keeping the scones fluffy and slightly crumbly, although perhaps me not adding quite enough flour may have had something to do with the crumbly part as well. Hmmm…


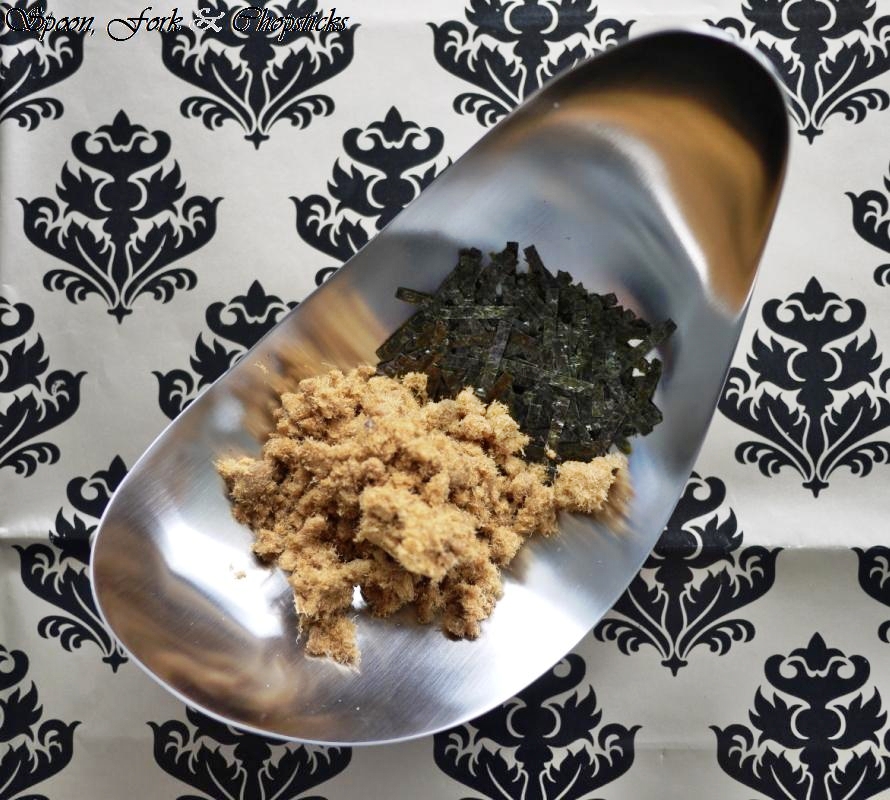
I decided to get a little bit Asian and split the dough in half; leaving one half plain and mixing pork floss and nori strips through the other like those soft buns found in Asian bakeries. The plain ones I preferred to have with the jam and cream, whilst the savoury ones worked well with butter spread on them. If done again, I just need to remember to ensure the nori is well-incorporated as exposed bits on the surface tend to burn!


Making these scones also gave me a chance to use part of our wedding gift from Wifey and strawberry jam brought back to us from a road trip by Mistress. Thank you again to the two special women in my life, for this and much more.


CWA Scones (makes about 12)
I scribbled this recipe down from somewhere but can’t actually remember where it came from. Multiple internet searches have proven fruitless for a recipe with the exact same ingredient amounts, although it just about matches various CWA recipe proportions.

Ingredients:
  • about 2 cups self-raising flour
  • 1 tbs caster sugar
  • pinch of salt
  • 180mL milk
  • 125mL thin/pouring cream

Method: 
  1. Preheat oven to 230°C. Combine flour, sugar and salt in a large bowl. Add milk and cream then stir with a flat-bladed knife until dough comes together. It should be soft and slightly sticky – add more flour if it’s too sticky to handle, add more milk if too dry.
  2. Turn dough out on a floured surface and gently pat to 2cm thick. Cut scones using a floured 7cm cutter and place close together on a lined tray lined with baking paper. Bake 10-12 minutes then transfer to cool on a wire rack.

happy cooking!

What’s in a wok?

Chinese home kitchens typically aren’t heavy with gadgetry. You will normally find a sizeable round chopping block, an all purpose meat cleaver, a fruit/paring knife and, at the centre of it all, a wok. A wok which preferably comes with a lid.

Woks can be used for essentially every type of Chinese cooking method – stir-frying, pan-frying, deep-frying, boiling, stewing, braising, steaming, smoking (the latter two are when the lid comes in handy) – hence their importance in the kitchen. As a result, the desirable features of a wok include even heating and having steep and deep sides to prevent spillage when cooking, as well as for practical spacing issues on the stove.

In a space-tight city such as Hong Kong, it is common for home kitchens to have two-burner gas stoves which sit atop a section of purposely low kitchen benchtop. The wok lives permanently on one of the burners because why would you need to put it away when you’re using it every day? And although I have a four-burner cooktop in my current kitchen, I still need to be mindful of large woks which can effectively invade the space of other burners despite it being positioned on only one of them!

My maternal grandfather had a small wok which was coveted by all family members. It heated up quickly and was relatively light, and had become blackened through being well-seasoned over many years of use which rendered it non-stick. It was narrow in diameter and had a rounded bottom which fit perfectly into the stove burners. This was inherited by an aunt of mine but sadly it had to be retired a couple of years ago.


Modern woks, such as the Anolon one pictured above, conveniently come with a non-stick coating which does away with the seasoning process and means little or no oil needs to be used when cooking. Well, unless you’re deep-frying, of course! They also tend to have a wider flat area at the bottom compared with traditional woks, which means you can still fry “flat” things (like eggs, crêpes, pancakes, etc) without everything pooling in a pit. At 30cm in diameter the Anolon wok is at the upper extremity of my ideal size, only because I have small hands and wrists and have trouble balancing anything larger, although the rubber-coated handle which is ingeniously taller than it is wide aids with its grip.

And grip is important when cooking things such as the stir-fry below, so that you can slide it out onto a plate when done rather than having to lift it out in sections and lose heat from your cooked dish.


Stir-fried bitter melon with egg (涼瓜炒蛋) (serves 2-3 as part of a meal)
Bitter melon is something I didn’t learn to appreciate until a few years spent living in Hong Kong. It was rarely available in Sydney during my childhood, although thankfully this is not the case now. Cantonese cuisine features melons/gourds from summer through to autumn, whilst the colder months are spent eating green leafy vegetables. Blanching the melon slices prior to cooking helps to temper the bitterness, and cooking it with egg adds a creamy sweetness.


Ingredients:
·         1 medium-sized bitter melon
·         2-3 eggs, lightly beaten
·         small chopped chilli, XO sauce (optional)

Method:
1.      Halve the bitter melon lengthwise and remove the seeds and soft inner pith by scraping with a teaspoon. Cut the melon into thin (3-4mm) slices.


2.      Heat a wok over medium-high heat and add the bitter melon. Pour enough freshly boiled water over to cover the melon slices. Add 1 tsp salt and stir until dissolved. Once the bitter melon slices take on a bright green colour, strain and set aside. Discard the cooking water.
3.      Return the wok to the heat and wipe dry the inside with a paper towel. Return bitter melon to the wok and stir-fry briefly with ½ tsp salt. (Chopped chilli and XO sauce, if using, can be added to the melon at this point in time.) Pour over the egg and let cook until starting to set before turning over, in sections – it does not have to be neat or kept in one piece like an omelette. Continue to flip and turn until the egg is cooked then slide onto a plate to serve.

Mademoiselle Délicieuse received an Anolon Advanced 30cm Open Stir-Fry pan for review courtesy of Kitchenware Direct as part of this post.

happy cooking!

Slow-cooked eggs and a bit of scientific fun

Eggs are amongst the first things I learnt how to cook. Boiling eggs is a good place to start – there’s no oil and no stirring, just a pot of water and an egg. Learning how to time an egg for soft/hard-boiling is another matter, and something which we try to perfect as we get more adventurous/picky with our food.


My mother recently returned from a trip to Hong Kong and presented us with an electric thermos kettle at Monsieur Poisson’s request. As the name suggests, it is an electrical device which is a hybrid of a thermos and a kettle. It boils the water for you and keeps it warm. Our poor stainless steel kettle is now wallowing in self-inadequacy in the corner of our kitchen, unsure of what to do with itself in the face of such competition. These hybrid devices have been available throughout Asia for many years where it is common practice to drink warm/hot water in any type of weather. What I didn’t know was that it can keep the water warm at a selection of temperatures. Constant temperatures! You probably know where I’m heading with this now.

So upon waking one fine Saturday morning, and with things such as eggs, ham and bread in our fridge to be used, it struck me that there is a 60°C setting on our new thermos kettle. The device manual suggests that 60°C is best for making up babies’ formula, whilst 80°C is best for green tea. There has been much discussion about the merits of cooking proteins sous-vide at lower temperatures, and especially so with eggs. And whilst I am able to boil, fry and scramble eggs without too much difficulty, poaching eggs is one of the cooking skills which remains elusive to me. There have been a number of attempts over the years, each resulting in some degree of failure.


Having tried slow-cooked eggs at places such as Koi, I was excited at replicating the smoother-than-tofu silken texture of the eggwhite enveloped around a perfectly runny yolk which bursts with a soft prod. The prospect of perhaps using the thermos kettle to poach eggs would be a convenient alternative to using a cooking thermometer (which, in any case, I do not own) and having to regularly check on the water level as well as temperature during the cooking process. Granted, the thermos kettle does not have a gauge of any sort to indicate an exact water temperature within, but I reasoned it would be good enough for my purposes. So in went four eggs for an hour – at which point is great to go and take a bath/read a book/do absolutely nothing – and then…


Success! *happy dance*

Perfect sprinkled with some salt and pepper, there is a myriad of ways you could serve the eggs apart from on toast. The possibilities to me are now mind-boggling and I bet Panasonic never intended for its thermos kettle to be used in this manner!


happy cooking!

Epicure Recipe Cards #32 & #12: Scallop Ceviche, Sesame Butterfly Prawns

Plans to prepare a simple, light and refreshing dinner isn’t always as easy as it seems. Whilst the cooking process may be straightforward and economical time-wise, the whole background planning and procuring of ingredients can be quite the opposite. When cooking seafood, and especially in the case of the ceviche below, not only is fresh quality produce important for taste but also for hygiene.

I forewent my local fishmongers and headed to the dedicated seafood section up the back of Paddy’s Markets at Haymarket, after having had brunch with Laura near-ish by. I was in complete disbelief when I found them hosing down the floors and preparing to close when it was only 2pm on a Sunday! This led to a trek around various fishmongers around Chinatown where I was successful in my quest for non-frozen scallops (roe attached!) and prawns.

Ceviche doesn’t involve cooking as such, but merely some slicing, mixing and steeping. In hindsight I sliced some of the scallops too thinly – perhaps due to being a tad excited about using my small, sharp knife for the first time – which resulted in the thinner slices being more “cooked” by the lime juice than desired. However the overall texture was quite interesting – soft on the inside, yet soft and sealed on the outside through the acidic action of the lime juice and reminding me of something which has been poached. I didn’t use the herbs specified in the recipe only because I don’t generally use herbs in my day-to-day cooking, which would mean a sad, slowly wilting bunch or two of them giving me guilty looks every time I opened the fridge door. (I really should research and invest in growing my own herbs in a planter box on the balcony. Tips appreciated.) Taste-wise I’m sure they would’ve added a fresh and fragrant dimension.


The scallop roe, which is not used in the ceviche, was put to good use Nigella-style and pan-fried in a little butter and olive oil with garlic – absolutely heavenly squished onto warm and slightly crusty bread rolls. Although I’m pretty sure my doctor would be less than impressed by this method of not letting the scallop roe go to waste. Hmmm.


The prawns required a little more work; needing their heads removed (Off with their heads!) and to be de-veined as well as being split down the middle with – yay! – that small knife again. But after that it’s easy with just a brushing of oil and sprinkling of sesame seeds and salt before popping them under the grill to curl and brown ever so slightly.


Enjoy the last of the warm(er) weather and enjoy these dishes sitting in the long, slanted shadows of late summer evenings. Glass of chilled wine in hand, optional.

Scallop Ceviche (serves 2-3 as a starter)
(adapted from The Age – Epicure 50 Best Recipe Cards, recipe by Jill Dupleix)

Ingredients:
·         6 large sea scallops
·         half an avocado, peeled & finely diced
·         2 tbs each of coriander and mint leaves (optional)
·         3 tbs lime juice
·         2 tsp caster sugar
·         ½ tsp flaked sea salt
·         1 tsp olive oil

Method:
  1. Clean and trim the scallops, removing any roe. Slice each scallop horizontally into 3 or 4 thin slices. Arrange on a platter in a single layer.
  2. Combine the lime juice, sugar, salt and oil and stir until the sugar has dissolved. Pour this over the scallops, ensuring each slice is covered and chill in the fridge for 15 minutes.
  3. To serve, transfer scallops from steeping mixture and arrange on a plate. Lightly toss the avocado and herbs (if using) in the steeping mixture and arrange in a mound on top of the scallops.

Sesame Butterfly Prawns (serves 2-3 as a starter)
(adapted from The Age – Epicure 50 Best Recipe Cards, recipe by Jill Dupleix)

Ingredients:
·         12 medium-sized raw prawns
·         1 tbs sesame oil
·         2 tbs white or black sesame seeds, or both

Method:
1.      Remove prawn heads, trim legs with scissors and leave the remaining shell on. Cut in half lengthwise down the underside (leg side), leaving them joined at the tail end and press to flatten a little. Arrange on a lined baking tray with the flesh side facing up.
2.      Heat an overhead grill to around 200°C. Brush prawn flesh with sesame oil and sprinkle with sesame seeds and a little salt.
3.      Place under the grill for approximately 3 minutes until prawns are slightly curled and lightly browned.

happy cooking!

Epicure Recipe Card #15: Nori-crusted Tuna

New Year’s Eve 2010 was a quiet affair at home for Monsieur Poisson and I as he had work duties to fulfil from the comfort of our study. Not that we’re terribly exciting people who go out partying to celebrate the event in any case but, as always, calendar occasions call for a celebration with food. And so I set about making a little too much food when there was only the two of us to feed, which resulted in abandoning some of the plans at the last minute.


The evening started off with salmon tartare which was a tad short of what I’d envisaged. I was thinking sexy poached eggs with golden yolk spilling out to enrobe the salmon morsels in a thick creaminess but, uh, although I’d employed the plastic wrap method let’s just say my egg-poaching skills leave a lot to be desired still. Taste-wise it didn’t disappoint, but perhaps learning how to poach an egg properly is something to make a resolution about.


Some pan-fried gyoza followed as well as something from another recipe card which I’d had in mind for entertaining purposes as it seemed extremely simple to make ahead as well as being a little special. The hardest part was finding sashimi-grade tuna at the local fishmongers, and nor is it cheap. Once that was done, there was virtually no preparation involved and just some flash searing in a hot pan before cooling and slicing. Easy! And I decided to do away with encrusting the tuna with nori, instead just snipping a few strips over the end product instead.

Although the recipe card describes it being served with lemon soy, the instructions suggest it can be served with wasabi mayonnaise or the former. Either way it really is one of the most low effort, stress-free things I’ve ever made and will be sure to impress guests with its geometric simplicity and pretty colouring.


Tuna Tataki (serves 2 as a starter)
(adapted from The Age – Epicure 50 Best Recipe Cards, recipe by Jill Dupleix)

Ingredients:
·         about 100g sashimi-grade tuna in log form – I’d bought a rectangular piece and just sliced down the middle to get 2 small logs
·         sesame oil, for brushing
·         ½ tsp black pepper, coarsely ground
·         1 tsp black sesame seeds
·         1 tbs light soy sauce
·         ½ tbs lemon juice – I used lime
·         ½ a nori sheet (optional)

Method:
  1. Brush sides of each tuna log with sesame oil and sprinkle over pepper and sesame seeds to lightly coat.
  2. Heat a dry, non-stick frypan and sear each side of the tuna for 1 minute. Set aside and allow to cool, then slice thinly. 

  1. Mix lemon juice with soy, adjusting to taste if necessary. Serve with tuna on a bed of shredded cabbage or lettuce, if desired. Snip strips of nori over the top if using.
happy cooking!

LinkWithin

Related Posts with Thumbnails